
How to use CalTopo & the Gaia GPS App to Plan your Backcountry Skiing Routes – Updated
(Last Updated On: )
This post originally appeared in January, 2017 but has been updated based on the latest versions of Gaia and CalTopo.
Backcountry skiing and ski mountaineering has lots of levels. Beginner backcountry skiers typically start touring around in heavily traveled areas, typically on passes. Loveland Pass, Berthoud Pass, and Red Mountain Pass have probably been among your old stomping grounds if you started backcountry skiing in Colorado. First, you started following skin tracks and ski tracks on these heavily traveled areas. Then, you found some more novel skin tracks which you followed to see where they went, and found some fresh goodness along the way.
But your desire to explore continued to grow. So, you bought a guidebook and skied all the routes of interest in it. But then you wanted more. You wanted to go where there weren’t tracks to lead you to your destination. You wanted to go where no one you know has skied before.
Frank and I have been exploring new destinations in the backcountry for years, within Colorado, many of the US mountain states, and even Canada. However, while exploring routes to write up for our backcountry skiing guidebook, we found ourselves thrown into terrain that we are completely unfamiliar with more often than not. To accommodate this, we developed some navigational techniques which we continue to use, even past our guidebook research.
How do we do it? Well, there’s no doubt that our route planning has evolved as technology has evolved. Cell phones and the available apps associated with them have allowed for more more involved route planning than we’ve ever done before.
So, here it is. Here’s our methods and secrets to route planning for backcountry skiing in zones that we do not know!
Gaia GPS App
The Gaia GPS App is a game-changer. Now, you can have an app on your smart phone that works nearly 100 times better than any other GPS you’ve ever owned. Unless you want only the most basic features, a Gaia GPS App membership is $19.99 annually, or $60 for 5 years on Google Play and iTunes, but if you purchase through our affiliate link, you will pay only $16 for the first year or $48 for 5 years. It’s worth every penny and it transfers from device to device as it is linked with your Google or iTunes account – so if you get a new phone, you don’t need to purchase the app again until your subscription is up for renewal.

There are a lot of things that go into learning how to use the Gaia GPS App, and this isn’t a tutorial in how to use every feature on it… that would take months. But, I’ll give you a few of the basics and some ideas of how to best use this app for backcountry skiing.
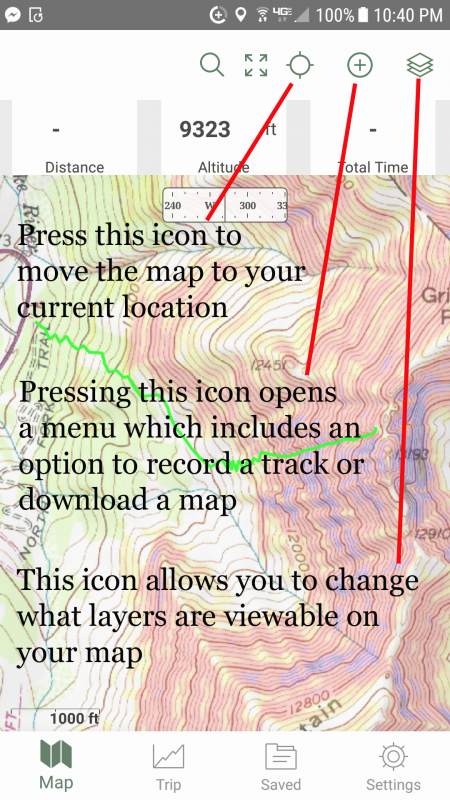
Once you open the app, you’ll get a map. If the map doesn’t go to your location, then click on the circular icon with the four dashes around it at the top.
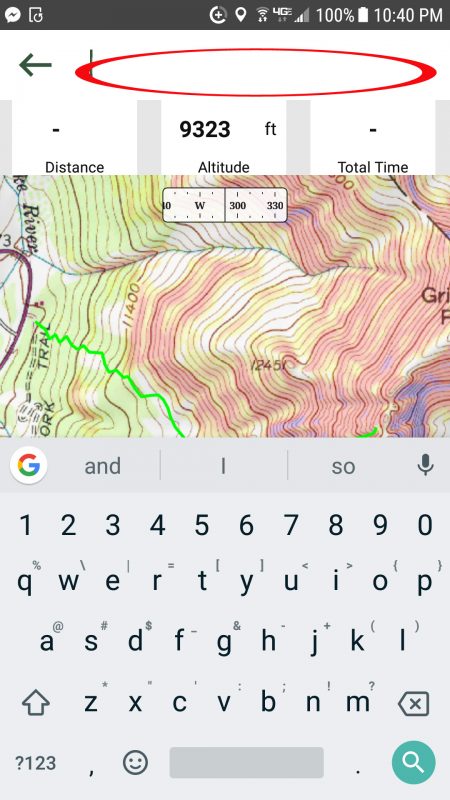
You can also search for places if you wish to review a place that is far from your current location. You can search using geographic names (ex. name of a mountain), names of nearby towns, or by latitude/longitude.
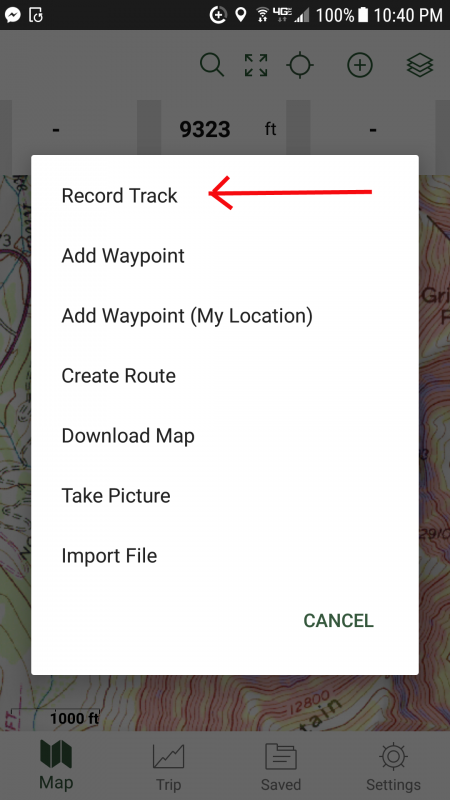
To begin recording your track, simply press the plus button with a circle around it, shown above. That will open a menu that will prompt you to begin recording.
The app is full of different base map choices. These are some that are available:
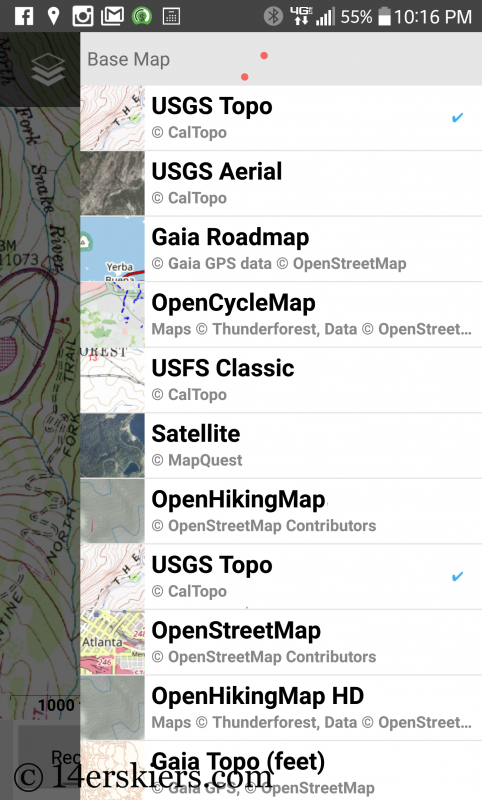
If you upgrade to the Gaia GPS Premium, you have additional layer capabilities (layers you can put on top of the base map) as well as a host of other features.

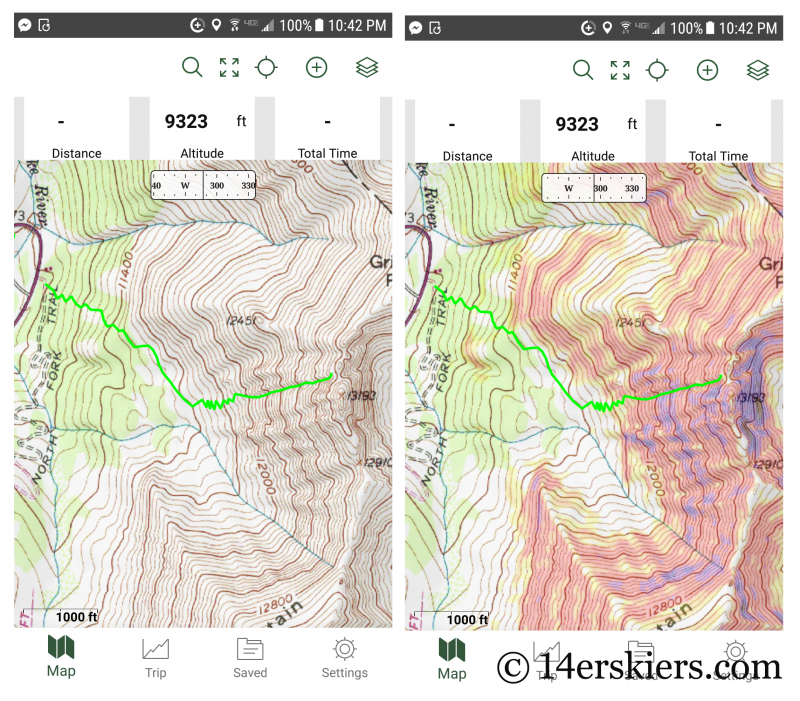
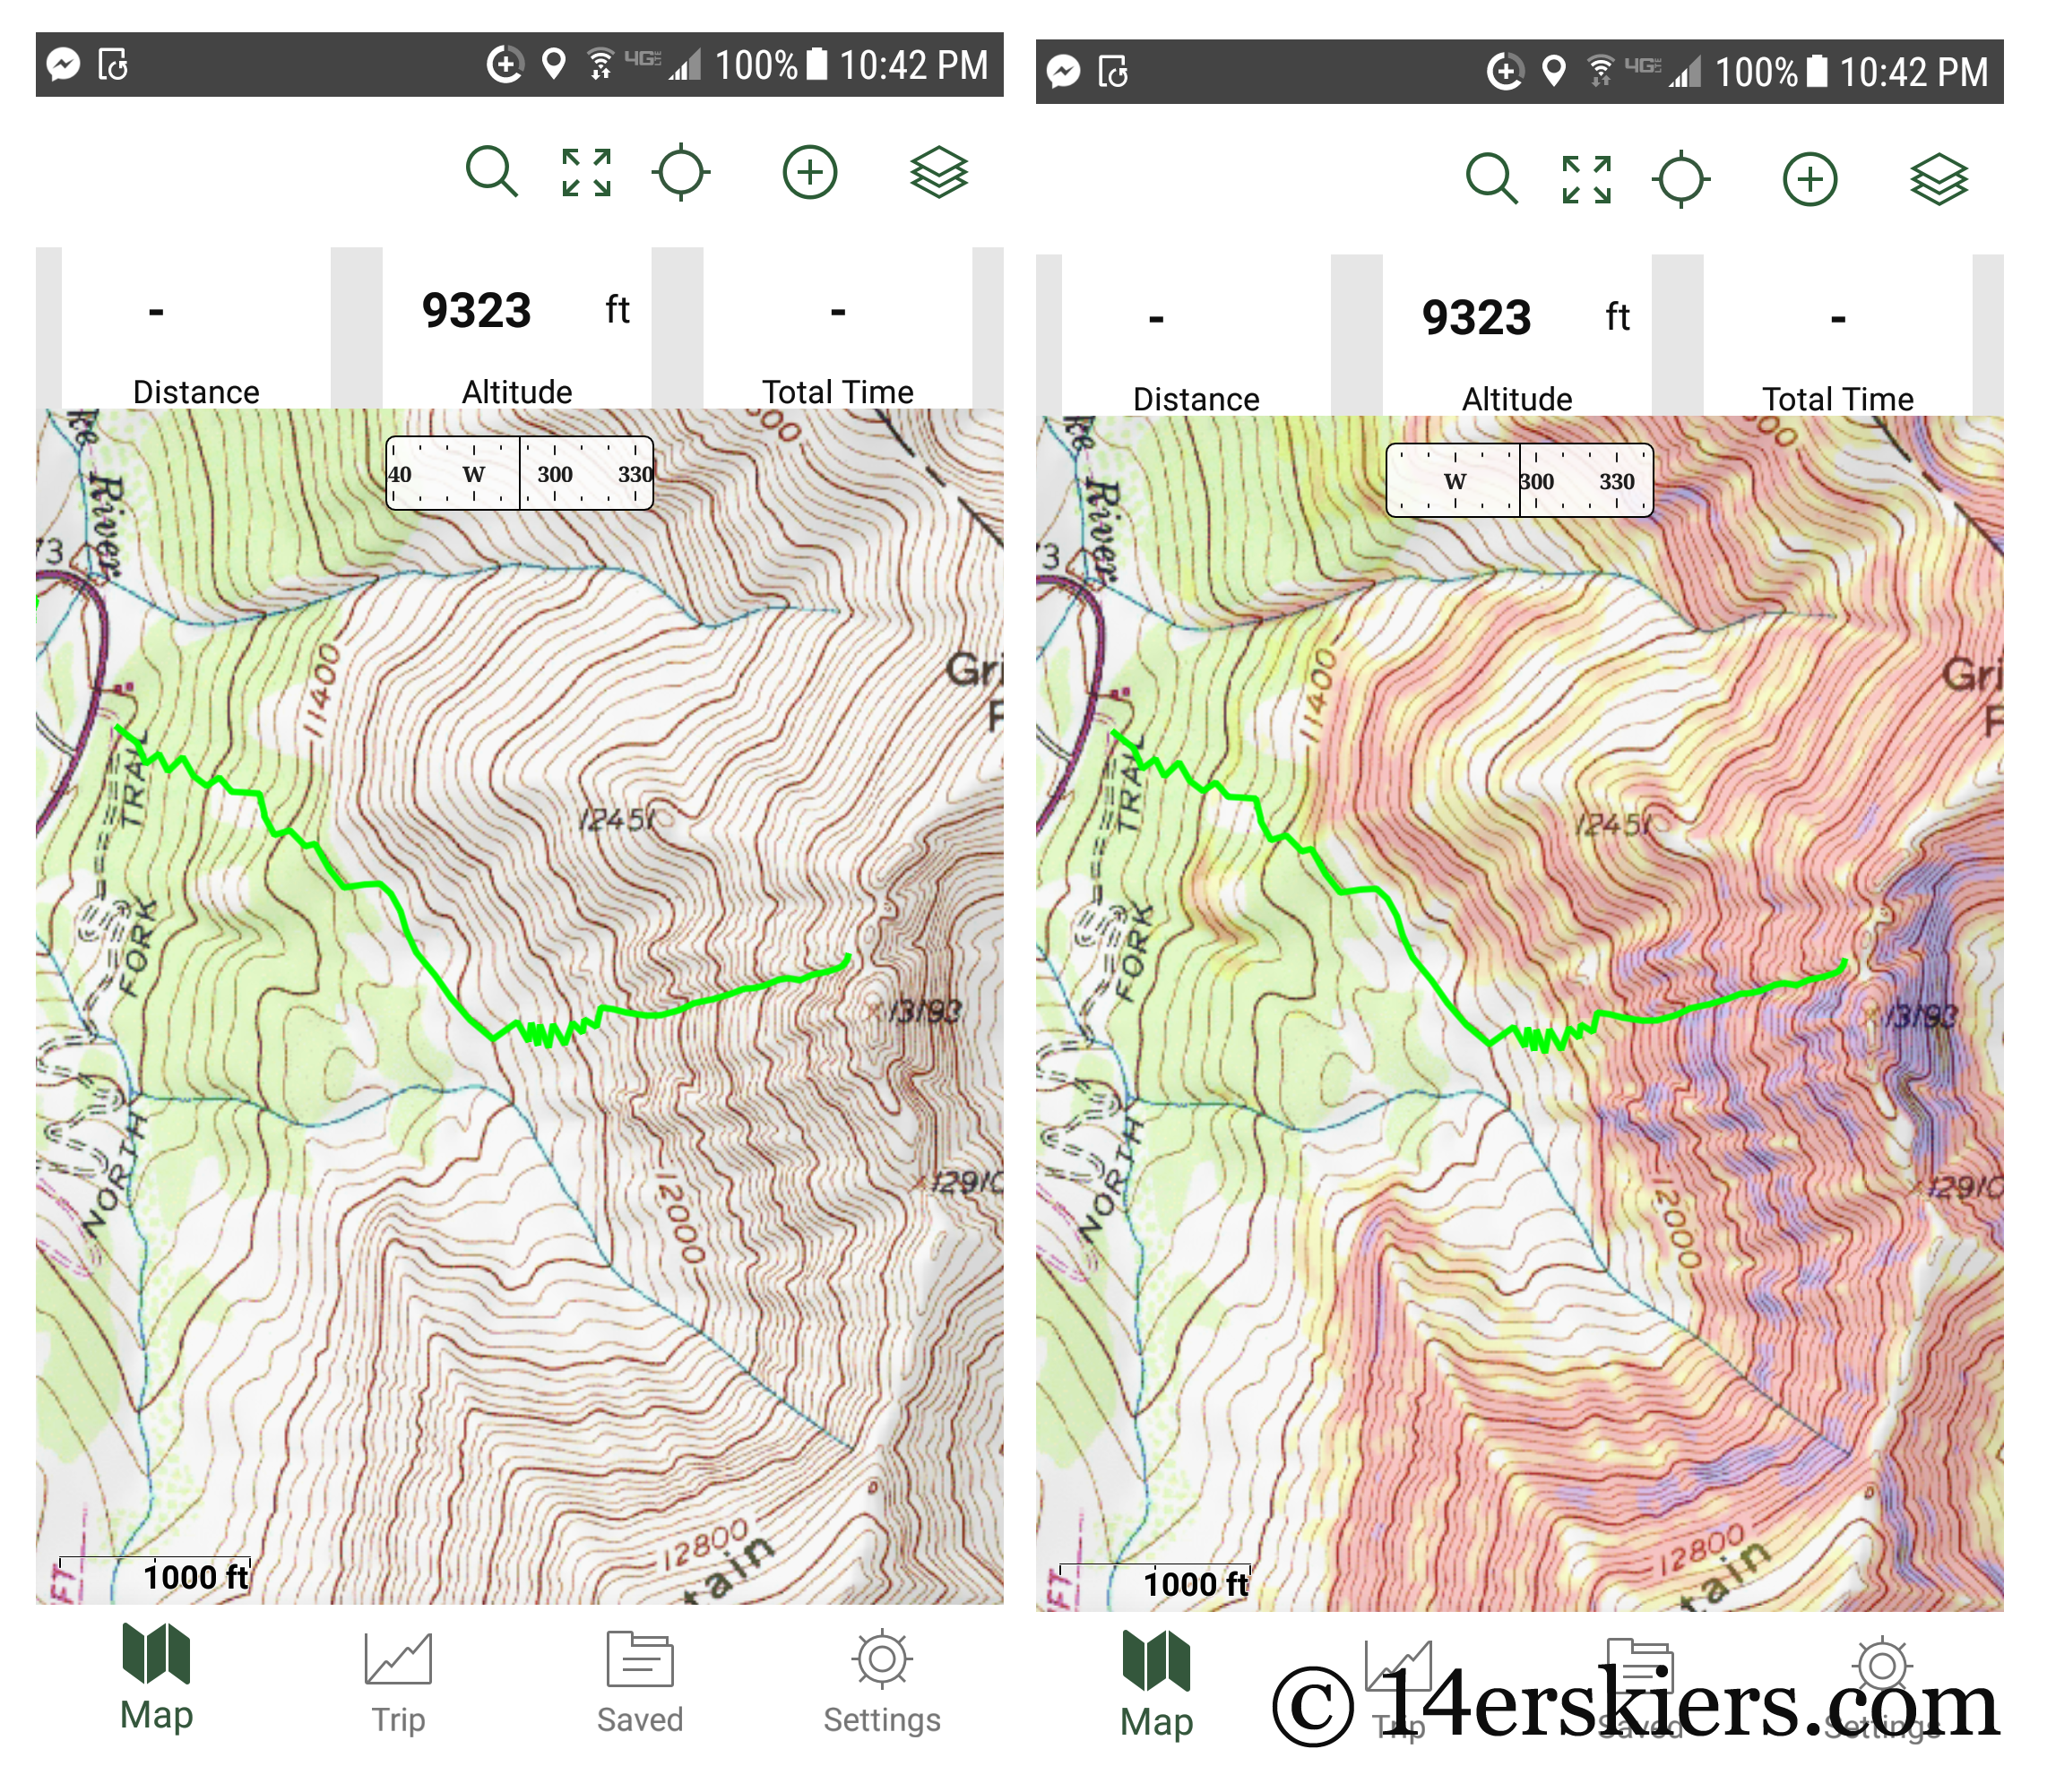
I am particularly fond of the slope shading layer, which tells you how steep a slope is – a huge asset when traveling in avalanche terrain. The slope shading layer is very similar to that used by CalTopo, further explained below. On Gaia GPS, the slope shading is available as a base map for the regular version, but this is difficult to use as it makes little sense without the topographic features. With Gaia GPS Premium, the slope shading can be added as an overlay on to the base map.
A Gaia GPS Premium membership is $39.99/year or $160 for 5 years – or if you purchase through our affiliate link it is $32 annually or $128 for 5 years. Most backcountry skiers will prefer this premium membership over the basic. More info can be found about the features included with each membership option in this article.
Can I use the Gaia GPS app in areas without internet or cell service?
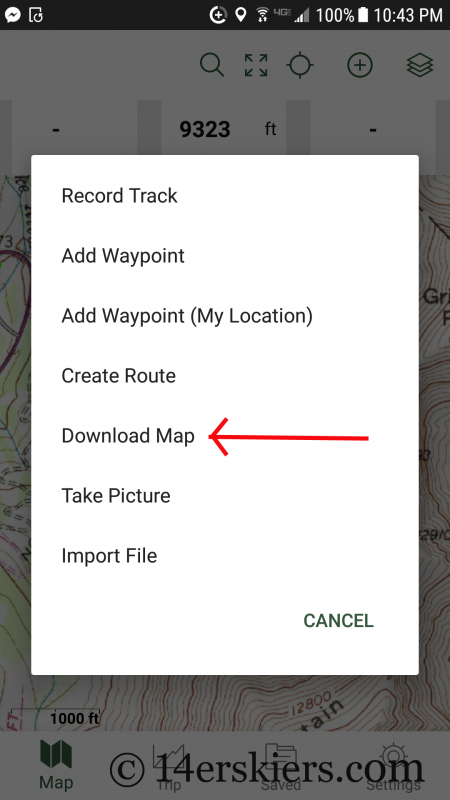
The answer is yes. But it’s best to download the maps you need in advance, and using the search feature mentioned above is best for this. To download the map, click on the plus button with the circle around it located at the of the screen. This will open a menu where one of the options is to “Download Map”.
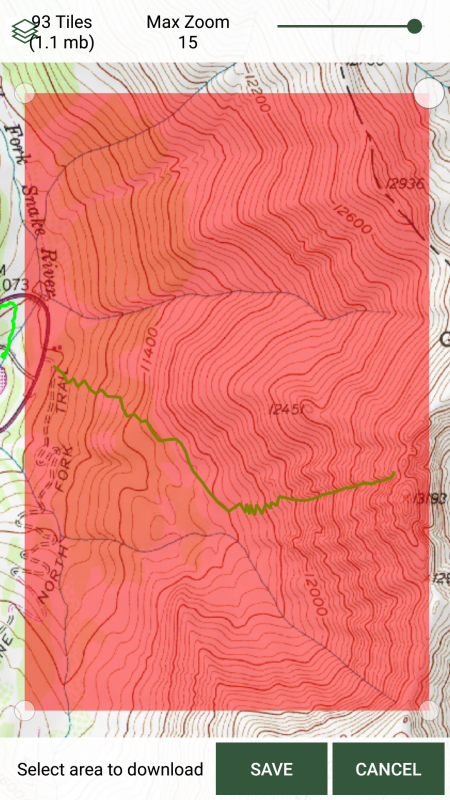
A box will appear on the screen which will allow you to select the area which you wish to download. It’s best to zoom out quite a bit so you get more area. Remember, you can always zoom in more when using the actual map. Once your region has been selected, press Save and follow the prompts. You can even give the map a specific name.
You can use your GPS app as it is, and plan as you go. But, it is often better to plan your general routes in advance. You can also plan your route using the Gaia GPS App, but I have found it slightly difficult to deal with – largely because I find it better to have a larger screen to allow for a better view for planning. My preference is to plan routes on CalTopo or Google Earth, and then import them to the Gaia GPS App.
Why is it better to Plan your Backcountry Skiing Routes in Advance?
There are probably dozens of reasons why it’s better to plan your routes in advance, but here’s a few things to get you thinking. First, using the slope shading layers can help you choose routes that minimize your exposure to avalanche terrain. Second, knowing your anticipated distance and elevation gain can help you have a better sense of the time needed for your tour – which is especially essential in spring when wet slides are a very real possibility. Third, it can make your travel more efficient as you will likely do less route finding along the way.
We also recommend having more than one plan in mind – back-up options for if your day or the snow conditions were not as you had hoped. Planning back-up options means you’ll be more likely to defer to them when needed, resulting in an overall safer backcountry experience.
Keep in mind that your route may not go exactly as planned. You may encounter denser trees than you expect, or cliff areas that do not show on the topo map, or rocky terrain. You will often have to do some navigation along the way, but creating a route in advance allows you to have a guideline to follow.
Planning Routes Using CalTopo
CalTopo is not an app. It is an online tool mapping tool that is best used on a desktop. Maps can be accessed on a mobile smart phone by using a simple web browser. But, you’ll find that many of the features are not accessible on mobile devices.
Gaia and CalTopo really work hand in hand. Just like Gaia has layer capabilities, so does CalTopo. Using CalTopo will help you use Gaia and vice versa.
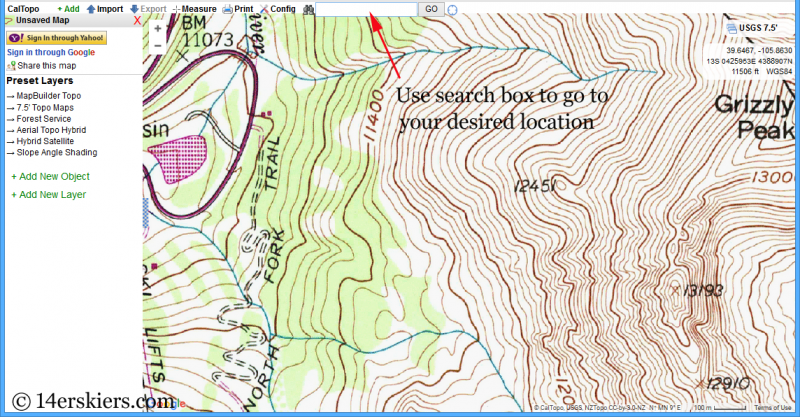
To start, you’ll want to search for your desired location. Similar to Gaia, mountains are typically searchable. But, in the case that you are searching for a peak that is a very common name (aka, Green Mountain, Baldy Mountain, Crystal Peak, etc) or a mountain with an unofficial name, you may find it best to search for the closest town and then scroll north, south, east or west on the map accordingly to get to your place you wish to research.
When route planning you may want to look at some of the other layer capabilities. You can access these layers by hovering your mouse over the “MapBuilder Topo” in the upper right of your screen. When planning a route for backcountry skiing, I am a fan of the slope shading layer. Notice that the color corresponds to a range of slope angles – a very useful tool when you are planning for travel in avalanche terrain.
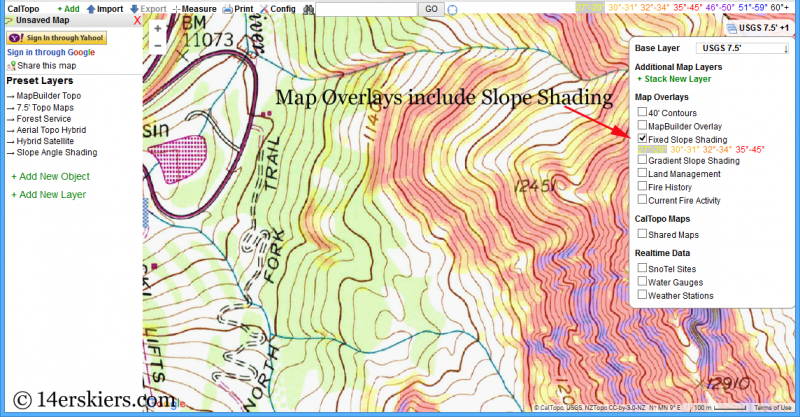
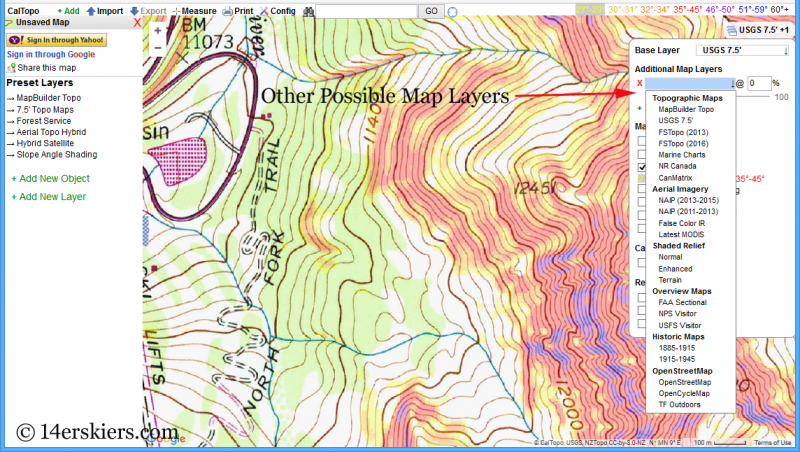
Many other map layers can be viewed as well and you may find them useful from time to time. Access these by clicking on “Stack New Layer” under “Additional Map Layers”. If you do not see the layer possibilities, try clicking on the empty field box with the down arrow shown in the photo. You can even choose a percentage for the opacity of the layers.
One of the simplest ways to plan your route is to simply start drawing a track as described in this image.
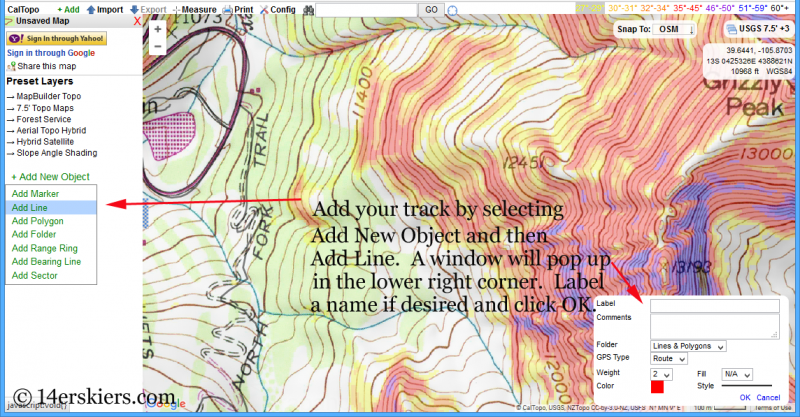
A pop up box will appear asking you to name your track. Name it if desired, and then choose your line style. If you do not choose, it will use a default. Click “Okay” to begin drawing your track.
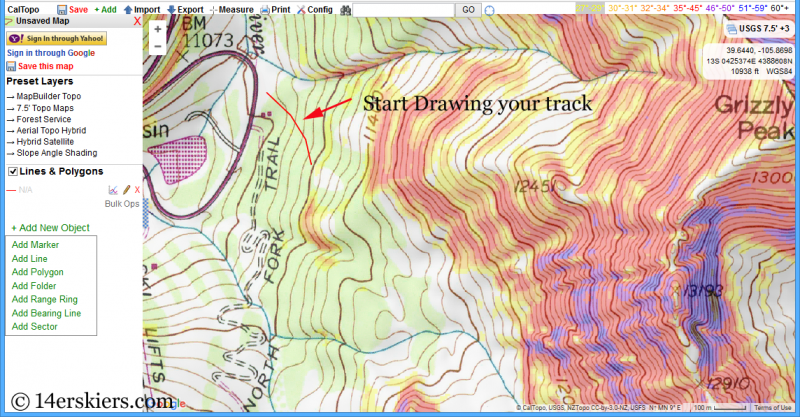
Use the mouse to draw your track, clicking on various points to break up the segment.
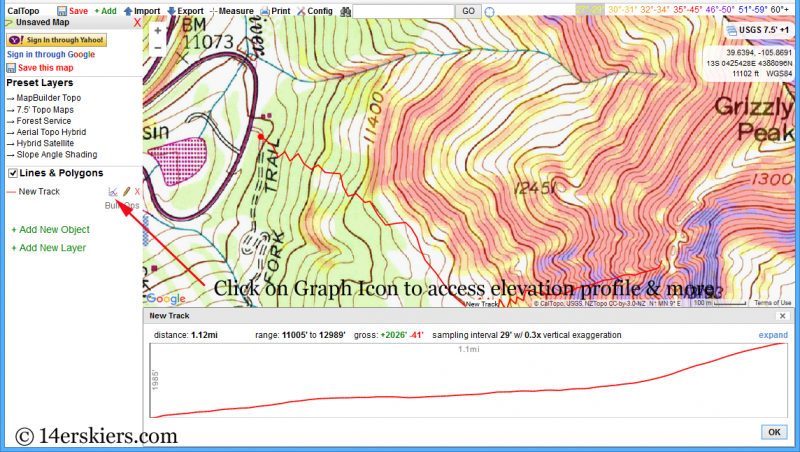
Once you have your track drawn, you can view essential information like distance and elevation gain by clicking on the Graph Icon next to the name of your route.
There are many features to CalTopo that I have not described – some are intuitive, others are not. If you have questions, you’ll find help documentation if you hover your mouse over the words “CalTopo” in the upper left of your screen.
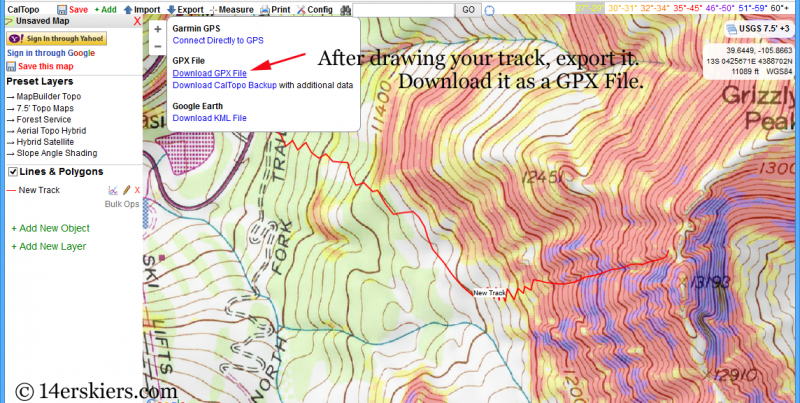
Last, you’ll want to export your track for use in Gaia. It’s usually best to save it as a GPX file.
Planning Routes Using Google Earth
Sometimes you may find it easier to plan routes using Google Earth. Certain features, like couloirs, are often easier to discern on Google Earth rather than a topo program like CalTopo or Gaia GPS.
Additionally, you can adjust the season in Google Earth (using the historical imagery icon and toggle) to better foresee how snow will be impacting your desired location.
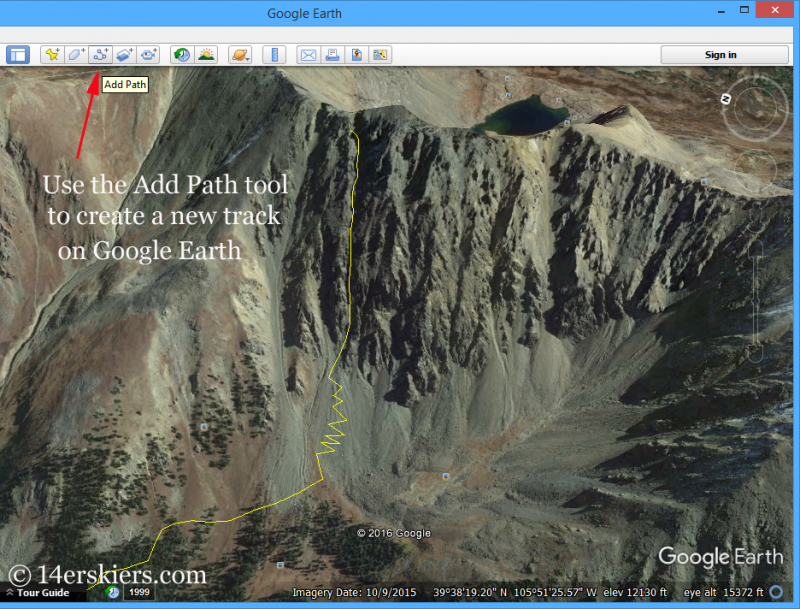
To create a track on Google Earth, use the Add Path tool. Similar to CalTopo, you’ll have the option to name it and change the color. Use the mouse to move and click to draw your route.
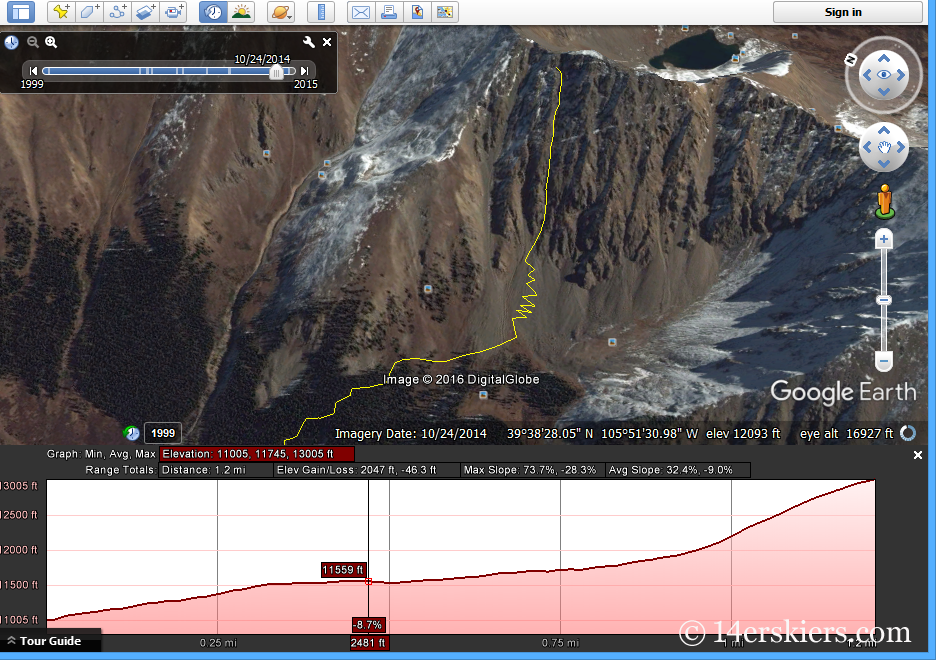
Also similar to CalTopo, you can view an elevation profile with distance. Simply right click on the name of your route on the left side of the screen (not shown in photo), and then choose “Show Elevation Profile”.
Once you are done creating your route, you will need to save it to your computer. To do this, click “File” in the upper right of the screen, and then select “Save Place As”. Save the track as either a GPX or KML file as Gaia GPS and CalTopo accept either one (CalTopo also accepts KMZ).
You may wish to import your file to CalTopo for further review or additions. For example, you may find it nicer to use Google Earth to mark a couloir, but better to use CalTopo to plan the approach.
Importing Routes to Gaia GPS
After you download your tracks to your computer, you will need to import them into Gaia GPS. The app will read either GPX or KML files. First, you need to figure out a way to transfer the files from your computer to your phone. You can use email, Bluetooth, cloud storage like Dropbox or Google Drive, plug your phone into your computer, or many other different methods. I prefer email for this purpose as it is very easy to transfer files.
Save your GPX or KML file to your phone, and pay attention to it’s location. Then, open the Gaia GPS App, press the icon with the plus sign surrounded by a circle located at the top of the screen, then select import file.
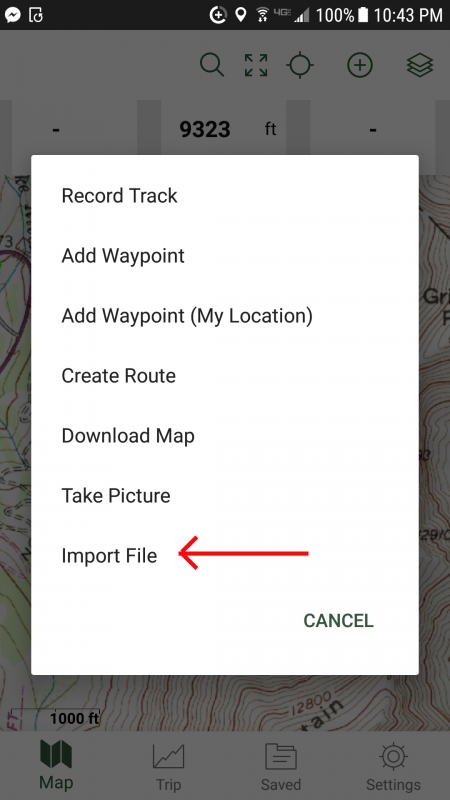
Clicking on “Import File” will lead you to a file manager which will allow you to search for the location of your track. If you save your downloaded files in the same place every time, it will open to this file folder upon default. Once you import the track, you should see it on the map. If you don’t, make sure the location of your map is the same location as the track – so you may need to adjust the location by using the search box mentioned above. Alternatively, you can click on the “Saved” icon at the bottom of the main screen. This will list all your tracks. Make sure the “eye icon” to the right of the name of your file does not have a diagonal line through it. If it does, click on the “eye icon” to remove the diagonal line, and the track should then appear on your map.
A Word to the Wise
Learning new technology takes practice and patience. Every program, every app, every electronic device has its quirks. Don’t plan your first route for a 14 hour day and think that all will go smoothly. Practice on shorter routes and maybe in places where you are more familiar with the terrain. Learn how to read the maps and use them as tools in your planning. Build up to longer days and more challenging terrain as your planning skills grow. Last, remember that you are working with a mobile device – in the cold. Know how your battery reacts to these situations and bring backup batteries or charging options if you think you will need them!
Have fun exploring more!
- Mount Buckskin (17 May 2020) - May 28, 2020
- Horseshoe Ski (14 May 2020) – The mountain whose journey nearly killed me - May 27, 2020
- Sayres X-Rated Ski (10 May 2020) - May 19, 2020
Gaia GPS updated with more tools and features: https://www.gaiagps.com/newsletter/2020/march-1v/premium/
Use the new Avalanche Forecast layer to stay up to date on official avalanche reports for mountain zones within the US. In partnership with avalanche.org, Gaia GPS now offers a color-coded overlay, displaying regional avalanche danger ratings. Add this map to your collection of backcountry safety tools and always know before you go.
A new tool on gaiagps.com now supports selecting custom areas on the map. Useful for land managers, search and rescue groups, and private property owners, the polygon tool measures the perimeter and acreage or km2 for any piece of land.