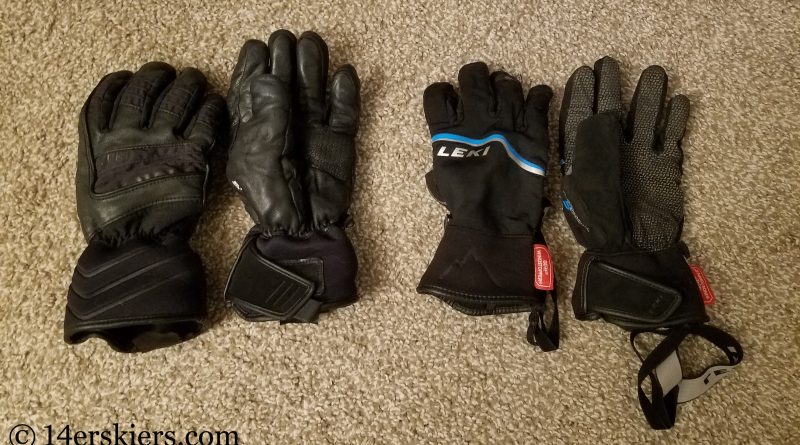
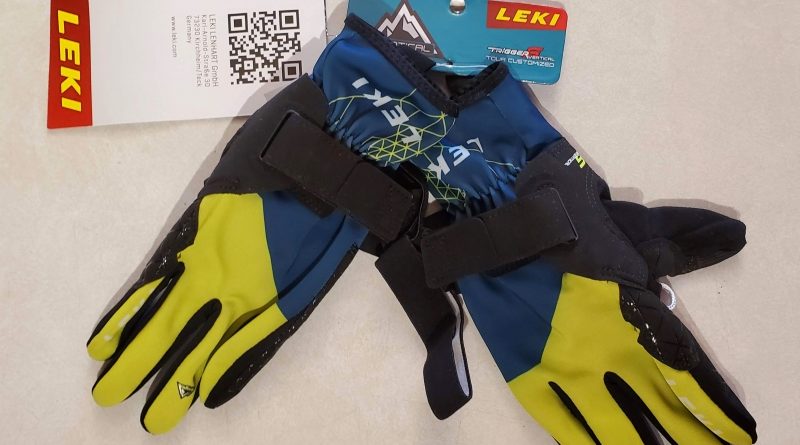
Category: Gear

Mount Baldy (WSC and South Bowls) 3.12.12

Posted by – March 18, 2012

After ascertaining that North faces were still holding some decent powder on Redwell the day before, and decent corn on the South faces on Gothic the day before that, Sydney Dickinson and I headed up Washington Gulch with hopes of finding one or the other. We ended up getting both…

The climb from the snowmobile went quick- so quick that it was obvious that we were too early to catch any corn. Western State bowl, on the other hand, was looking pretty good so we dropped in there. Sydney:

Read more

SIA: Pieps Vector Beacon, Global Finder, and iProbe

Posted by – March 8, 2012

This is our final report from SIA. We were, happily, distracted up in Alaska. Pieps is coming out with some great innovative products, and they’re definitely worth checking out. First up, one of their newest beacon offerings- the Vector.

The Vector is different in several ways from most beacons. For one thing, it’s a 4-antenna beacon, and for another it uses a rechargeable lithium-ion battery. The multiple antennas should decrease the “thinking time” during a search, and the rechargeable batteries should let you start every tour at full power. As long as the battery lasts a long time (so charging it isn’t an issue on an extended multi-day hut trip or expedition), I’m all for it. As a side note, and most people know this, don’t use rechargeable batteries in other beacons!

But the big thing with this beacon is its’ GPS capabilities. While this can be used just for fun tracking your tours’ mileage and vertical, it also adds some great features for searching and rescue. Assuming you have cell or satellite phone coverage, you’ll be able to use the GPS function in an emergency to notify rescuers of your position. Then there’s the “dig-dug” screen, as some have taken to calling it:

Sadly, this is a bad picture, but those of you who remember the old video game Dig-Dug will quickly understand it. If you’re searching a large avalanche debris field, this mode will keep you from retracing your steps as you work to acquire a signal. Just watch the screen and make the screen turn from black to white as you cover ground. Definitely a useful feature if you’re searching a large area.

This seems like a really great beacon, but it’s a bit bulky and not exactly cheap (though it has more features than most).

Up next is the Global Finder. The best way to describe this product is a cross between a SPOT/PLB rescue beacon and a satellite phone, plus everything you’d find in a GPS unit. If you were way off the beaten path, you would be able to use it to communicate- to say hi to loved ones, or to ask a weather guru what they thought the next week might be like. And if an accident strikes, you can send out an emergency signal like a SPOT/PLB, and also receive messages from Search and Rescue or a doctor’s advice. Pretty sweet. You might notice that it’s the exact same body as the Vector. Coincidence? Or a sneak peak at the super-beacon of the future?

Finally, there’s the iProbe. Here’s Carl killing Carl:

The iProbe is really cool to see in action. Basically, it’s a beacon on a probe that assists in your final fine search. A few extra seconds can be saved by using the iProbe, and if everyone in the party has an iProbe-compatible beacon like the Pieps DSP, it can turn them off automatically once it hits them. In a multi-person burial, this would be a really useful tool to have, especially if everyone was using Pieps. I would imagine some of the heli and cat operations would find the iProbe very useful. For the average recreational user, it might not be worth the cost and slight additional weight (compared to a regular probe). Nevertheless, hats off to Pieps for coming up with such an innovative product.

Review: Neova DNA Damage Control Sunscreen

Posted by – March 7, 2012

Photobucket

Neova contacted me a couple of months ago, asking me to review their sunscreen products. I’m always game for testing anything out. But, I have to admit, I was skeptical as I am usually particularly picky about sunscreen. I didn’t know that Neova would send me the best facial sunscreen I’ve ever used.

I usually find that facial sunscreens are too scented and feel like a glop of grease on my face. Those that pass the initial odor and grease test often still continue to clog the pores on my already oily face, causing break outs. The one or two sunscreens that don’t do any of the above still rub off easily if I want to use them while playing in the outdoors. Neova sunscreen is the only sunscreen I’ve tried that passes all these criteria.

After using Neova every day for the last month, I’ll be honest, I’m amazed at Neova’s performance. Using “transparent” zinc oxide, this sunscreen feels light when applying to my face. Instead of contributing to the oil on my face, it seems to reduce it. In fact, using this sunscreen has actually caused me to have less break-outs. With SPF’s in the 40′s it’s a great, and essential, sunscreen for a high-altitude girl like myself.

More than just a Sunscreen
Neova DNA Damage Control does so much more than protecting you from daily doses of UV-rays. This sunscreen also contains DNA repair enzymes which help correct and reverse some of the cellular damage already caused by harmful UV-rays. Liposomes are used to deliver the DNA repair enzymes, targeting the site of the DNA injury, reducing the risk of skin cancer and premature skin aging. After using this sunscreen for a month, I already notice a reduction in dark spots and an increase in softer, younger-looking skin.

This video gives a brief explanation of how the DNA repair enzymes work:

Not just for the Ladies
There is no doubt that Neova DNA Damage Control Sunscreen is geared toward women. But, I did have Frank test the sunscreen as well. In his words, “Even a guy can tell that’s some mean sunscreen.”

Two Products
I had the opportunity to test two different Neova DNA Damage Control products: the Everyday sunscreen with SPF 43 and the Active sunscreen with SPF 45. Both sunscreens boast transparent zinc oxide for broad-spectrum protection, DNA repair enzymes, Vitamin C to promote vitality, and a superantioxidant (L-ergothioneine) to suppress free-radical damage.

While still providing the same basic protection and repair, there are a few things that do differ in the sunscreens. The Everyday sunscreen contains sodium hyaluronate to provide a moisturizing boost and Vitamin E for it’s anti-oxidant and moisturizing properties. The Active sunscreen comes in a formula that is highly-water resistant, perfect for outdoor athletes.

I find the Everyday and Active sunscreens to be the perfect mix. Living at 9,800 feet, I know I am unusually susceptible to the sun, and I tend to wear sunscreen every day. The Everyday sunscreen is perfect for the weekdays where I work and then play hard after. The Active sunscreen is perfect for the weekends where I play hard all day. Either way, Neova DNA Damage Control sunscreen has become part of my daily regimen. I highly recommend this product to both active men and active women, especially those who have sensitive and picky skin like me. Like I said, it’s the best facial sunscreen I have ever tried.

Link to Neova DNA Damage Control website.

Refilling Your BCA Airbag Canister: Tips and Tricks

Posted by – March 5, 2012

When it came time for us to buy airbag packs, one of the big questions we had was what traveling with them might be like. Obviously it isn’t an issue for roadtrips, but for flying would an airbag pack prove to be a minor inconvenience or a major hassle? That was our question, and our recent trip to Alaska provided the perfect opportunity to discover an answer.

First off, here’s the official info from BCA, complete with an instructional video. Ideally, wherever you’re visiting has a refill center, and in our case in Alaska, we had a couple to choose from in Anchorage. So, after getting our practice pulling the trigger on the airbag back in Colorado and traveling to Alaska, we found ourselves at Dive Alaska. It’s pretty simple really- take your empty cylinder and unscrew the two allen bolts seen here:

Next, pull the trigger pin out to release the valve stem. The valve stem has a tiny O-ring on it which may be broken or lost when the airbag is activated. While the O-ring can potentially be re-used, it’s best to re-grease and install a new O-ring. Your BCA canister came with all these parts, as well as instructions covering all this (the empty looking bag is actually grease):

Then your refill center fills it back up, to 2700psi. Because the cylinder will heat up and the pressure will change as it cools down, it may take a while. We did not wait long enough (or Dive Alaska filled it too fast) and we ended up with cylinders just below the recommended pressure by the time we got to Girdwood, 45 minutes away. This is the one thing I’ll be paying more attention to in the future- it’s best to make sure the pressure has stabilized in the proper range before taking off. Cost was $10 per canister.

Back here in the Crested Butte area, we were able to refill at All Sports Replay in Gunnison. For some reason they’re not on BCA’s list of refill centers, but they definitely knew their stuff. The cost here was $7.50, and it should be noted that had I done the re-lubing of the valve myself, the cost would have only been $4.00. Pretty good deal for those of us in the Gunnison Valley.

The final verdict: traveling with the Float 36 in this case was just a minor inconvenience, not a major hassle. Check out the smaller Float 18 for the sidecountry:

SIA Miscellaneous Gear

Posted by – February 12, 2012

Blizzard Skis
While checking out the Tecnica Cochise boots, we also took some time to check out next year’s line of Blizzard skis. We were particularly interested in the free mountain series as well as the Kabookie, intended for touring. The free mountain series was largely a brainchild of the late Arne Backstrom. They are a rockered ski, but Blizzard prides themselves in the fact that the rocker is done before construction, rather than after. This helps to reduce “tension” in the ski. The free mountain series uses a metal topsheet with Blizzard’s signature FlipCore, a lighter wood core. Next year’s line includes the Bodacious (118 under foot), Cochise (108), Bonafide (98), and Bushwacker (88). The Kabookie takes the free mountain rocker construction and tweaks it a bit for easier use in the backcountry. The Kabookie is more or less like the Bonafide (98 underfoot), but lacks the metal topsheet, making it lighter and a bit more forgiving.

Photobucket

Read more

SIA: Airbags From BCA, Mammut, Dakine, and TNF

Posted by – February 7, 2012

When it comes to airbags, the only logical reason I had to hold off on a purchase was to wait and let some other manufacturers enter the airbag market. After all, more competition leads to lower prices and more innovation, or so I’m told to believe as any good American consumer. That’s why our health insurance premiums in the USA are so low, thanks to competition between health insurance companies. Ouch, bad example.

A year ago, several big-time pack manufacturers weren’t in the airbag game- names like Osprey, Black Diamond (BD), Dakine, The North Face (TNF), and more. While BD sorts out what they want to do with their avalung technology, and who knows what Osprey is doing, Dakine and TNF unveiled their airbag packs this year. First, Dakine:
Altitude 40l:

Altitude 25l:

As a fan of Dakine packs like the Heli Pro and the Poacher, I was tremendously excited to see what Dakine would come up with. Dakine decided to contract with ABS, and the ABS system is more or less zipped onto the Dakine pack. On the one hand, this allowed Dakine to use ABS’ many years of experience in this field to produce their own airbag pack, but on the other hand Dakine didn’t exactly come up with anything new or exciting as far as airbags go. Using an existing system won’t do a whole lot to reduce the price or weight of an airbag pack, and those two things remain as the biggest detriments to potential airbag buyers.

Read more

SIA: Black Diamond update

Posted by – February 4, 2012

Though Frank and I are not true to one brand for all of our gear, there is no doubt that Black Diamond is among our favorites. We spent quite a bit of time checking out next year’s line up of new gear. Here’s some of what we found.

The patent ran out on Flicklock, so they developed a new and improved version of their current Flicklock system. This one will be more user friendly, with a wider lock lever. Also, it’s less likely to loosen, which sometimes occurred with the old Flicklock system.
Photobucket

Photobucket

You’ll notice a wider hold on the top of the pole grip, for better gripping with the palm when you need it most. The Whippet largely remains the same, with a few minor changes to the grip.
Photobucket

Black Diamond skins are currently our favorite skins on the market. Gaining popularity is the split skin, shown on the left, intended for skis 115 mm or wider underfoot. With backcountry skiers venturing further with fatter skis, this skin fits a growing niche in the market. The goal of this skin is to save a bit of weight while also significantly improving glide.
Photobucket

Users will notice some changes in the BD skins as well. They’ve made them noticeably thinner, for a beneficial weight savings. At the same time they changed their glue to improve adhesion in colder weather. Lastly, but perhaps more importantly, they lengthened the “hairs” on the skin, to improve both glide and traction.
Photobucket

One of the neatest changes we saw was the addition of the Ergoactiv system to their Covert pack. This unique system allows for flexibility at the waist.
Photobucket

Photobucket

Observing the system and how it works is one thing, but actually trying it on is another. Both Frank and I were pleasantly surprised at how noticeable this feature is on the pack. This Ergoactiv system improves both comfort and flexibility, especially when you need to bend down and mess with something on your boot or bindings. We felt that more packs should carry this feature.
Photobucket

While most backcountry skiing pack companies are in the process of developing some sort of airbag system, Black Diamond has taken a step back in this technology. We were informed that BD will produce an air bag pack, but they are grappling with whether to continue to incorporate the Avalung or not. Have airbag packs made the Avalung obsolete? Or is there still a need for both features in a pack? These questions are an ongoing discussion. It will be interesting to see what BD develops from this in the future.

For ski boots, the line remains unchanged from the current season. Look for changes in 2013-14.

Thanks for the detailed tour BD!

Seth Morrision’s “The Ordinary Skier”

Posted by – February 2, 2012

This winter in (most) of the Western USA got you down? Here’s a couple of solutions.

First, pick up a pair of these skis. AT $199, plus a free ski bag, plus free shipping, plus no tax in most states, how can you not?

Then, basking in the glow of your purchase, check out “The Ordianary Skier”. I really enjoyed watching Seth Morrison getting his ski mountaineer on in Chamonix. Great Flick- free right now on hulu. Enjoy:

SIA: Binding Wars- Tyrolia/Head and Salomon/Atomic

Posted by – February 1, 2012

The Marker Duke and Baron bindings have proven to be very popular over the last few years, so it certainly shouldn’t be a surprise that some of the other big players on the downhill binding market are now providing some competition. This class of binding deserves its own name- perhaps “Downhill Touring” (DT) or “Freeride Touring” (FT). Another player in this category is the MFD Alltime, a hinged plate that you can attach almost any standard alpine binding. Yes, they tour to an extent, but not like a Dynafit/tech binding or even a Fritchi. But that doesn’t mean I don’t like the category.

First, some thoughts on my Dukes. I actually like them a lot. Unlike my Fritchis or Dynafits, I can ski them inbounds with 100% confidence. Additionally, unlike my Dynafits I can quickly change from my alpine boots to my AT boots. When I’m unsure if I’ll be touring or skiing inbounds, I can limit myself to the Dukes without compromising too much touring or aggressive skiing inbounds. But any tour more than a couple of hours is just plain brutal.

They’re also very useful for the lazy man’s versions of backcountry skiing- namely slackcountry and sled laps. This is a topic that is rarely discussed, but should honestly be on your mind when you do tours of this type. Let’s say you’re in Jackson Hole and you head out the Rock Springs gate and hike up the pre-existing boot pack. You ski first and then watch your partner get caught in a slide above you. If you’re in standard alpine bindings and you have no skins, you’ve basically signed your partners death certificate- you’ll spend an hour postholing up to the debris just to break out your beacon/probe/shovel to find a corpse. So please, if you find yourself skiing slackcountry make sure you have some sort of backup plan (a touring binding of some sort plus skins) to reach your partners.

Enough of that, let’s get to the Tyrolia/Head offering, the Adrenalin, complete with a high DIn setting of 16.

Tyrolia’s offering seeks to differentiate itself through a “floating” heelpiece. All the cool new ski designs are rendered somewhat moot if a DT binding, with its huge rigid zone, doesn’t allow the ski to flex the way its designers intended. So the Tyrolia binding doesn’t fix the heel of the binding in place- instead it has 2 small cylindrical tabs mate up with two similar tabs on the fixed part of the heel to lock it down while still allowing movement. Even a quick hand flex of a ski will show the system works. The system is visible on the brushed metal fixed part of the binding and the “rail” of the binding above it. Also, unlike the Duke, you don’t have to step out to go from ski-hike-ski modes. The question we’d like to see answered in real-life usage is whether or not the system ices up during the skin, making it difficult to get into ski mode (the duke requires careful cleaning of its track to lock it down).

Does it work in practice? We won’t know unless we get a chance to try the binding out on the snow. Another feature of the binding is that you can adjust the binding length without tools- but really, how hard is it to use a leatherman, even out on the trail? Then there’s this:

Yes, that’s plastic connecting the toe and heel. Not a single bit of metal in there. Now, I had the original white Fritchi Titanal binding, and I broke the metal connecting rod on that binding in relatively short order. The next Fritchi, the blue Titanal 2, had a much stronger and heavier connecting bar that I never did break. I can only hope that Tyrolia did their homework- if that plastic breaks on a skier somewhere exposed, it’s going to be a nasty accident. I’m not sure I trust it, that’s all I can say, but time will tell with this binding. Reported (unverified) weight is 40g more than the Duke, and well over 100g lighter than the Salomon.

Speaking of which, on to the Salomon Guardian.

Like the Tyrolia, the Guardian lets you switch modes without stepping out. This is something that drives me crazy about not only my Dukes, but also my Dynafits. Hit the flats at the end of the run- boom, go to tour mode. It gets steeper again- boom, go to ski mode. This feature alone gets me excited about this binding. The “teeth” that lock the binding down in ski mode look less prone to ice and snow buildup as well. Also like the Tyrolia, this binding isn’t entirely “fixed”, allowing the ski to flex naturally. It’s interesting to note that both bindings addressed both of these Duke downfalls. Still, I’ll take a wait and see approach with this binding given Salomon’s other ill-fated forays into the touring world.

More on the Tyrolia:

More (a lot more, at almost a half hour) on the Salomon:

SIA: Tecnica Cochise, Cochise Light, and Cochise Pro

Posted by – January 31, 2012

Brittany headed down to Denver last weekend to attend the SIA show and check out some new gear. We have a lot of “quick-look” products to show everyone, and hopefully we’ll get a chance to thoroughly test and review some of these products in the near future. We’d love to throw in some fun stoke from the backcountry as well, but we’ve pretty much cut out backcountry skiing for the time being thanks to the horrible snowpack we have here in most of Colorado. At least we have Alaska to look forward to in the near future.

In any case, one of our first stops was the Tecnica booth. I’ve been extremely happy with my Cochise boots (REVIEW HERE), but I wanted to learn more about them as well as some new offerings in the Cochise line-up. In my review, I stated that the Cochise boot was the first AT boot I’ve skied that truly skied like an alpine boot, something I’ve always wanted and hadn’t previously found. So why do they ski so well?

Not surprisingly, they ski well because Tecnica did their homework. AT boots present a bit of a challenge for boot designers. After all, they’re supposed to be light, have a tremendous range of motion, grippy soles, and then turn around and perform well on the descent. In an alpine boot, the upper and lower cuffs work as one unit, and inputs from the leg are quickly and decisively transferred from the boot to the ski. AT boots, on the other hand, have to separate the upper and lower in order to achieve a range of motion while in walk mode. In general, the upper and lower are connected in three places- the two hinge points at the ankles, and usually with a metal bar or rod in the back of the boot. Just how much lateral stiffness does that provide? Even rearward in some cases? Not much, in my experience. That’s great if the latest greatest stiff boot claims a forward flex of 200- if the lateral flex doesn’t match it, you might as well put some dynafit fittings in your street shoes and ski that way.

Tecnica tried to mate the upper and lower cuffs of the Cochise, and I think they’ve made some great strides in that area. Here’s the lower- notice the metal “H”:

Here’s a combo view with part of the lower cut away. There’s a lot to look at- notice for one thing that the screws on the replacable soles go into T-nuts. Then there’s the Tech fitting (sitting by itself in the heel pocket) that also has metal reinforcement. But you’ll really want to check out the “T” fitting tied to the string in the middle of the boot. This is the part on the upper that fits into the “H” seen above. Click, click- upper and lower mated so much better than before.

Read more